
Measure to make better
Measurement is fundamental in the production of just about everything. The National Physical Laboratory (NPL) estimates that more than £600 billion worth of goods and utilities every year are sold based on their measured quality. Without measurement, it is not possible to manufacture products efficiently, with a designed function, within specification and on cost. Measurement and verification typically account for 10% to 20% of production costs, an estimated £30 billion per annum in the UK. Metrology is also important in developing and policing the standards that underpin global trade.
Measurement and verification typically account for 10% to 20% of production costs, an estimated £30 billion per annum in the UK
The relentless pursuit of ever smaller dimensions and finer tolerances in products of all sizes is driving the development of metrology. As manufacturing moves to ‘nano’ (almost atomic) dimensions, scales between 100 nanometres and 0.1 nanometre, metrology must follow suit. The application of micrometrology and nanometrology to manufacturing is a key element of ultra-precision engineering. The goal is to achieve nanometre measurement accuracy on the manufacturing shop floor. Ultra-precision engineering is always seeking ‘the next decimal place’ or faster measurement of the current decimal place.
Ultra-precision engineering is always seeking ‘the next decimal place’ or faster measurement of the current decimal place
Research into precision engineering and the associated metrology includes: its fundamental philosophies; ultra-precision machine design principles and techniques; modern measurement techniques; optical design; and a wide range of inputs from nanotechnology. Precision engineering requires breakthroughs and sustainable solutions in the manufacturing and measurement of complex geometries, fusing nanotechnology into the macro world at the levels of accuracy generally called ‘engineering nanotechnology’.
Metrology must also think big. Large structures such as those used in wind energy, aviation and ship construction require an increasing number of sophisticated and individualised large components, and require new approaches to metrology. For example, blades for wind turbines (now over 70 metres long) involve working to close tolerances that approach the limits of current small-scale manufacturing and production metrology.
Large structures such as those used in wind energy, aviation and ship construction require an increasing number of sophisticated and individualised large components, and require new approaches to metrology
One obvious role for metrology is in measuring, maintaining and recording the accuracy of machine tools on aerospace and automotive production lines, which are important manufacturing and export industries for the UK. The accuracy of machine tools determines the quality of the products they make. For the past two decades, researchers at the University of Huddersfield’s Centre for Precision Technologies (CPT) have made significant improvements in measuring and compensating for machine tool inaccuracies, and for the temperature changes and vibrations on a noisy production line. An important part of this progress has been in the ability to carry out rapid geometric calibration and to use thermal imaging and flexible temperature-sensing strips to make accurate temperature measurements. A key application has been in the development of compensation systems for machine tools, such as large vertical turning lathes, to make them accurate enough to produce jet-engine casings at Rolls-Royce.
Live control of machines is not all that matters in manufacturing. Machine tools can consist of massive arrays of metalworking machines that operate on three axes. Setting up such a system can take time. One indicator of progress in metrology for such systems is in speeding up this set-up process. For example, research at Huddersfield has helped Rolls-Royce to reduce the average time for full machine calibration from days to hours [see Quick change for machine tools]. The ability to control machinery in this way has built on advances in collecting and processing data from accurate sensors. Temperature measurements alone are not enough: effective thermal compensation also relies on the ability to combine on-machine strain and vibration measurements with temperature measurements. Work on data fusion, and the development of new algorithms that bring together data from sensor networks, has become increasingly important in metrology.
Quick change for machine tools
Manufacturing depends on timing, not just the time it takes to make something such as a turbine blade, but the time that goes into setting up machine tools before production can begin. Rolls-Royce worked with staff from the Future Metrology Hub, based at the University of Huddersfield, on a project that helped to reduce the time needed to calibrate a five-axis machine tool used to make turbine blades from up to five days to less than two hours.
Manufacturing depends on timing, not just the time it takes to make something such as a turbine blade, but the time that goes into setting up machine tools before production can begin
The research leading up to this improvement in set-up times was a part of the SAMULET (Strategic Affordable Manufacturing in the UK through Leading Environmental Technologies) programme. Led by Rolls-Royce, the first phase of this collaborative initiative drew on the work of several universities on next-generation gas turbine technology. The overall project, which included the work at Huddersfield, ran for four years with a total budget of £80 million, and brought in Renishaw, one of the world’s leading developers and suppliers of metrology systems. The research fed into the company’s development of new metrology systems.
SAMULET considered several factors, including seasonal variations in working conditions. Temperature changes can affect the accuracy of machines tools, as can the need to adapt to the introduction of new products. One part of the work was to investigate different ways of monitoring temperatures. It turned out that thermal imaging is a valuable tool that can provide a lot of temperature information quickly, but it must be used with scientific rigour.
One outcome of the research was a machine-tool calibration system that used methods based on artificial intelligence to optimise the measurement process and reduce downtime by a factor of 10 in manufacturing at large aerospace facilities
The research paved the way for better use of data captured by machine tools and their metrology systems. As in many areas of manufacturing, software plays an increasing role in these processes. One outcome of the research was a machine-tool calibration system that used methods based on artificial intelligence to optimise the measurement process and reduce downtime by a factor of 10 in manufacturing at large aerospace facilities. Monitoring data from machine tools can also help to reduce how long it takes to verify that the system is still correctly set up. Here the research, in collaboration with a team at the University of Bath, reduced verification times from 30 minutes to around two minutes.
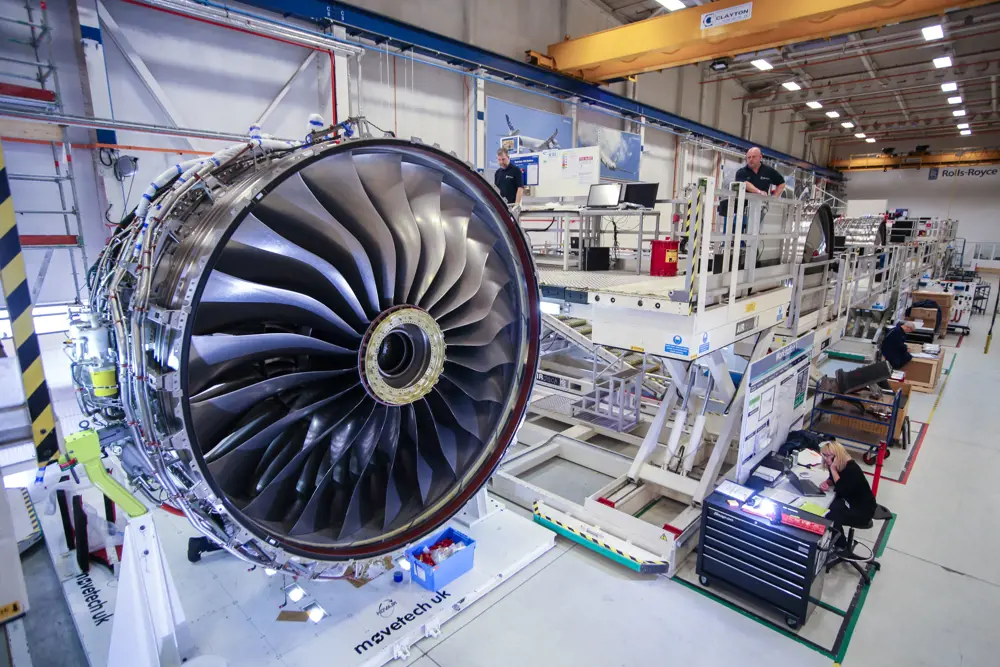
Rolls-Royce partners regularly with the Future Metrology Hub at the University of Huddersfield. The research carried out has developed the company’s machine tools processes, for production of components such as jet-engine casings and gas turbine blades © Rolls-Royce
At the surface
Another important area of metrology is in the measurement of surfaces. While a surface might appear flat and smooth, measurement and characterisation can reveal a complex structure, often the result of factors involved in the manufacturing process. Surface size, geometry and texture are important in precision and ultra-precision engineering. Today’s metrology can involve measuring ‘features’, such as the devices on an electronic chip or micro-electro-mechanical systems (MEMS) whose dimensions are similar to the texture of the surrounding surface.
Surfaces are also increasingly sophisticated. It used to be that the whole surface needed the same geometrical tolerance, but surface textures can now have the same size as important functional features. For example, if cylinder liners in a car engine are too smooth, the pistons seize up. The surface texture is important to allow oil to flow for lubrication. Metrology has to be able to measure that ‘roughness’.
Next-generation products demand super-smooth surfaces, freeform geometries or even microstructures deliberately added to the surface to provide functional performance
Next-generation products demand super-smooth surfaces, freeform geometries or even microstructures deliberately added to the surface to provide functional performance. Such surfaces include those used in optics in high-power laser systems or in earth/space-based large telescopes. Surfaces are also crucial in interfaces in fluid dynamics, such as energy-efficient jet engines, aircraft fuselages and wings. Increasingly important challenges in surface measurement include medical implants such as artificial joints, micro-electronics and MEMS machines, nano-electro-mechanical machines and in nanotechnology applications in general.
While it is important to be able to make precise measurements in the controlled environment of a laboratory, in manufacturing the real challenge is to make measurements at very high speed on a busy production line. The ideal is to use non-contact techniques with robust and accurate instruments that are as small and easy to use as possible and that can measure in real time and control the manufacturing processes. For example, industry is working on roll-to-roll approaches (creating electronic devices on a roll of flexible plastic or metal foil) to the manufacture of two promising new technologies, polymer solar cells and flexible electronics. These will need on-line metrology to detect and enable repair of defects. The same requirement already exists for the manufacture of current silicon-based photovoltaic solar cells. At Huddersfield, research has focused on detecting defects in the 40-nanometre-thick environmental barrier films for photovoltaic modules, where pin-holes in the film can allow water into modules, leading to electrical shorts and ultimately to the failure of modules.
While it is important to be able to make precise measurements in the controlled environment of a laboratory, in manufacturing the real challenge is to make measurements at very high speed on a busy production line
Traditional approaches to surface metrology, mostly based on physical methods of measuring surfaces, cannot keep up with the demands of modern manufacturing. Stylus profilometry is the current state-of-the-art in terms of vertical measurement of surfaces, to quantify their roughness, with a tip scanning the surface. However, profilometry is a slow process and often cannot be used on soft or elastomeric materials, including many plastics and rubbers, or for materials that are prone to being scratched. These drawbacks rule out profilometry for optical surfaces, for example, and for nanoprinting, which is often on soft materials.
Modern approaches to surface metrology use non-contact methods such as interferometry, which uses electromagnetic waves, to carry out fast areal surface measurement of microscale and nanoscale surfaces. The most common of these is the scanning white-light interferometer (SWLI). Although one of the most flexible approaches, it is slow since the optical system must move through the vertical measurement range.
Modern approaches to surface metrology use non-contact methods such as interferometry, which uses electromagnetic waves, to carry out fast areal surface measurement of microscale and nanoscale surfaces
To alleviate the speed issue, researchers at the Engineering and Physical Sciences (EPSRC) Future Metrology Hub, based within the CPT, have developed interferometry devices with no mechanical moving parts. This provides the possibility of very fast measurement and the ability, through clever optical design, to make the instrument robust to environmental outside influences. One such system is based on the principle of wavelength scanning interferometry (WSI). The instrument has now become an industrial product, developed by the Centre for Process Innovation, IBS Precision Engineering and the University of Huddersfield and sponsored by the EU-funded NanoMend project. WSI is now used to detect the presence of microscale and nanoscale defects in coatings used to protect flexible photovoltaic cells, which are manufactured by roll-to-roll techniques. A demonstrator WSI system is operating on a pilot production line at the High Value Manufacturing Catapult Centre for Process Innovation.
With added challenges
🚲 Additive manufacturing (3D printing) creating structures beyond traditional metrology techniques
Additive manufacturing, sometimes dubbed 3D printing, is becoming an indispensable component of the manufacturing toolbox for the aerospace, medical and automotive industries. Additive manufacturing opens up opportunities in the design and creation of novel shapes, and at small production runs. It can also use a range of materials to create products that are lighter and more efficient in their use of resources.
These attributes, and the geometrical complexity that it allows, mean that additive manufacturing brings new challenges for metrology. In its recent National Strategy 2018–25, Additive Manufacturing UK highlighted ‘test and validation’ as a priority area for the UK’s high-value-manufacturing sector.
Additive manufacturing can create 3D structures that are beyond the scope of traditional metrology techniques where probes touch surfaces. This is why there are moves to use non-contact methods based on optical, electrical or magnetic measurements for example.
One example of additive manufacturing in action is the creation of frames for bicycles. Robot Bike Co. turned to Renishaw, which is involved in both metrology and additive manufacturing, when it wanted to make customised mountain bicycles. “We believe a bike should fit the individual,” said Ed Haythornthwaite, the company’s CEO. This meant customising the bicycle frame to each rider, which is where additive manufacturing was used. All the complex parts of the frame are made from titanium using additive manufacturing. These parts, along with more conventional carbon fibre components, allowed Robot Bike Co. to use innovative design approaches that avoided some of the failure mechanisms seen with other manufacturing techniques.
In additive manufacturing, metrology can happen in real time, in-line with measurement tools integrated into the nozzles and heat sources that lay down material, or off-line after production. On-line metrology can draw on fast imaging techniques, such as optical, X-ray, e-beam, ultrasound or scanning probes.
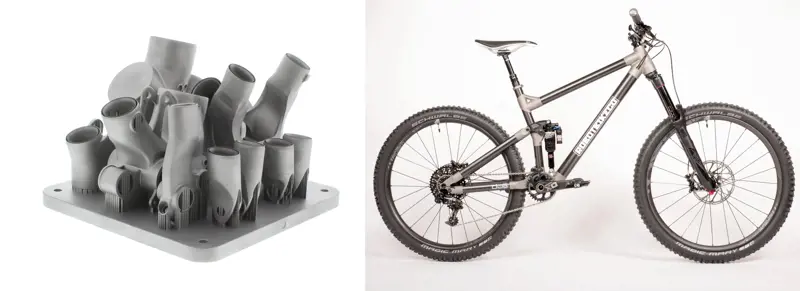
The titanium lugs for Robot Bike Co.’s bespoke MTB bike frame were produced using Renishaw’s selective laser melting process, an additive manufacturing technology that can build components directly from computeraided design geometry using fine metal powders © Renishaw/Robot Bike Co.
Additive manufacturing
Metrology must also keep up with the development of new approaches to making things. Additive manufacturing, for example, can create items with an infinite range of shapes and internal features that are not possible with conventional manufacturing techniques, such as milling, turning and grinding. The geometries are often free form and surfaces can be extremely rough, with various holes and internal spaces, which can create shapes that are beyond the scope of existing approaches to metrology. For example, additive manufacturing processes can ‘print’ freeform surfaces, with no obvious symmetry. How can an instrument measure surfaces that are inside these novel shapes?
Additive manufacturing, for example, can create items with an infinite range of shapes and internal features that are not possible with conventional manufacturing techniques, such as milling, turning and grinding
In additive manufacturing, checking the geometry of parts as they come off a production line has moved away from the conventional coordinate metrology systems used in precision engineering. Techniques such as X-ray computer tomography (XCT) are now used to measure the internal and external geometry of parts and even the surface roughness of features. However, XCT is not yet fully traceable in a metrology sense. Measurement traceability describes an unbroken chain of comparisons, relating an instrument’s measurements to a known internationally agreed standard. If traceability can be established, XCT should provide a way of assessing the conformance of parts made through additive manufacturing.
The process of additive manufacturing may also enable a different approach to metrology, measuring and controlling what is going on as each layer is added. Two techniques show promise in this area: infrared, or near infrared, thermal imaging of the melt pool and powder bed, and secondly, optical or ultrasonic scanning of the solid layers of the part as they build up. The hope is that, in the future, these optimised metrology systems will provide the basis for feedback control in additive manufacturing. Renishaw, which has its roots in metrology, is also increasingly involved in additive manufacturing and uses this approach in its processes.
The idea is to measure what is happening in the manufacturing process and use the data gathered as a measure of the finished product. However, one problem with this strategy is that the additive manufacturing process can create terabytes of data, too much to allow immediate analysis. The way around this is to look for anomalous signals in the data that indicate that something is going wrong. One complication with additive manufacturing is that by its very nature it is designed for smaller production runs, which means that there is a smaller archive of processing data for metrologists to draw on.
Additive manufacturing is not alone in creating novel surface geometries that need new approaches to metrology. Modern optical devices, such as cameras in mobile phones, no longer rely on symmetrical lenses. The rise of freeform optics, aspheric optics and diffractive optics require new measurement techniques.
Quantum metrology exploits quantum phenomena – processes that show quantum behaviour at the macroscopic scale – to deliver new standards for time, frequency, length, charge and other key fundamental measures
Wind turbines push metrology to the limits
🌬️ The complications of producing large sophisticated components such as wind turbines
Manufacturing, and metrology, can come near their limits in the production of large sophisticated one-off components such as blades and mechanical components for wind turbines, which must be made to close tolerances, requiring careful control of production and quality inspection. Failure of the mechanical components in a wind turbine can lead to downtimes of days or weeks, especially for offshore systems where the weather can make maintenance hazardous.
A further issue for metrology is in trying to measure the efficiency improvements that arise from new designs. There should be convincing field tests to confirm that those improvements are real enough to persuade engineers to introduce new designs.
As wind turbines increase in size – they already use some of the largest bearings produced – engineers must devise innovative technologies that integrate measurement processes into manufacturing. Structures such as wind turbines are often just too big to fit into conventional measuring devices or to be taken to a calibration laboratory, and must be measured in process or in situ. The need to make these measurements in an uncontrolled environment complicates the pursuit of accurate and traceable metrology to meet the regulatory pressures in many industries.
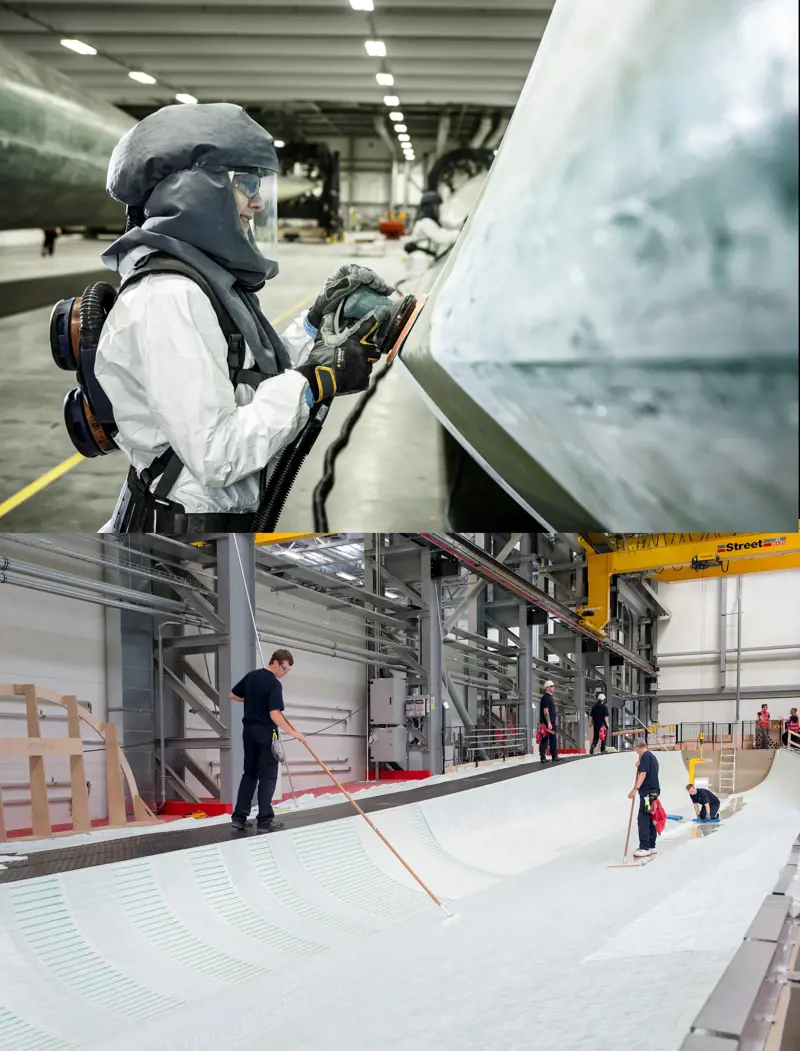
Siemens makes 75-metre-long rotor blades at its new Green Port Hull factory. These blades, for 7 and 8 megawatt wind turbines, are individually made from fibreglass-reinforced epoxy. More recently, Siemens has introduced hybrid carbon blades. Different blade materials make it possible to tailor wind turbines for different locations, onshore and offshore and in areas with different wind conditions © Siemens
Another challenge, and opportunity, for metrology is the growing industrial interest in the application of quantum technology, exploiting our understanding of the physics of atoms in materials and surfaces and their interactions with electromagnetic radiation of different frequencies. Quantum metrology exploits quantum phenomena – processes that show quantum behaviour at the macroscopic scale – to deliver new standards for time, frequency, length, charge and other key fundamental measures. The NPL has established a Quantum Metrology Institute, investing over £30 million including a £4 million equipment investment from the UK’s National Quantum Technologies programme.
The ideal approach to measuring what goes on in production is to embed sensors into manufacturing processes. This requires miniaturised and affordable sensors that can collect data in dynamic situations. Many of these sensors use a combination of optical interferometry, structured light projection, and guided wave optics and quantum technologies. For example, it is now possible to create a complete optical ‘system-on-chip’ by integrating photonic devices on a silicon wafer, bringing together a tuneable laser, phase-shifter, wavelength de-multiplexer and wavelength encoder.
The ideal approach to measuring what goes on in production is to embed sensors into manufacturing processes
The importance of metrology for the future of manufacturing in the UK led to the creation of a new research centre based in the Centre for Precision Technologies at the University of Huddersfield. One of six new EPSRC-supported Future Manufacturing Research Hubs, the Future Metrology Hub will work with Sheffield, Loughborough and Bath universities, alongside NPL. Each research hub will address long-term challenges facing the UK’s manufacturing industries, with a programme of innovative research in the engineering and physical sciences, related to the challenges in commercialising early-stage research. EPSRC will invest £10 million in the metrology hub while a large consortium of industrial partners has already pledged more than £30 million.
The current vision for metrology research is to develop the concept of the ‘factory on the machine’. The idea is that metrology technology will make it possible to design, manufacture, measure and correct production in a single integrated system. Such an approach would create the essential link between design, manufacture and verification, leading to high-value manufacturing in digital, flexible, reconfigurable and autonomous factories. In this way, the ‘right first time’ factory could fabricate bespoke geometric products. The recent National measurement strategy, 2017 to 2020, from the Department for Business, Energy and Industrial Strategy, pointed to the general view in industry that we need more real-time, in-line measurement of manufacturing processes to allow process control, delivering right-first-time production and increased productivity, such as sensors on machine tools.
having more data does not necessarily increase its value. It is important to understand the quality, reliability and integrity of that data and to ensure that it leads to appropriate decisions
The strategy forecasts that this ‘fourth industrial revolution’ will see a rapid, powerful convergence of several big technology changes including autonomous vehicles, sensors, biotechnology, 3D printing, robotics and artificial intelligence. This vision for the future of manufacturing, sometimes billed as Industry 4.0, will naturally draw on the growing ability to capture the torrent of data produced by the growing portfolio of metrology techniques. However, there is no point in generating and capturing data for its own sake. The digital revolution may have brought with it the ability to generate, combine and manipulate huge quantities of data, but having more data does not necessarily increase its value. It is important to understand the quality, reliability and integrity of that data and to ensure that it leads to appropriate decisions.
***
This article has been adapted from "Measure to make better", which originally appeared in the print edition of Ingenia 74 (March 2018).
Contributors
Michael Kenward OBE
Author
Keep up-to-date with Ingenia for free
SubscribeRelated content
Design & manufacturing

Super cool(er)
Welsh startup Sure Chill has developed a cooler that uses the properties of water to keep its contents cool for around 10 days without electricity. This is ideal for storing items such as vaccines where electricity sources are unreliable.

R&D investment makes good business sense
In just five years, Dr Ralf Speth FREng has presided over a revolution in design and manufacturing that has helped create a new family of engines and has overhauled Jaguar Land Rover (JLR) production facilities.

Steel can arise from the ashes of coal
Thousands of people were laid off in the UK steel industry in 2015 and there are pessimistic future forecasts. Professor Sridhar Seetharaman of the Warwick Manufacturing Group argues that smaller, flexible steel mills implementing new technology would better cope with fluctuating global trends.

Integrating metrology in business and academe
Professor Jane Jiang’s interest in measuring began when she worked on a bus production line in China. She found that the best way to improve quality, consistency and productivity was through metrology, the science of measurement. Today, she runs the UK’s largest metrology research group.
Other content from Ingenia
Quick read

- Environment & sustainability
- Opinion
A young engineer’s perspective on the good, the bad and the ugly of COP27

- Environment & sustainability
- Issue 95
How do we pay for net zero technologies?
Quick read

- Transport
- Mechanical
- How I got here
Electrifying trains and STEMAZING outreach

- Civil & structural
- Environment & sustainability
- Issue 95